- Home
- Birthday Cards
- Color of Spring Card
Make This Simple Color of Spring Card!
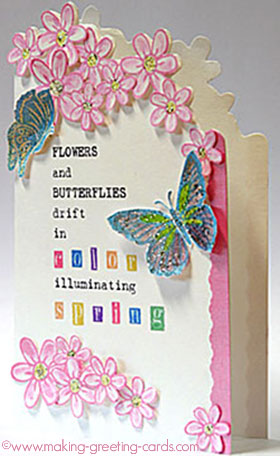
Here's a color of spring card that is easy to make and a delight to receive. The phrase used on this card is:
Flowers and butterflies drift in color illuminating spring.
For this card I used Microsoft Word to generate the phrase mentioned above.
If you like, you may highlight the text above and copy and paste into Microsoft Word. Place it wherever you like, change the font, and color, etc.
I have also included a pdf file that you can download and print.
Note:
You can print texts for your homemade cards using funky or decorative fonts from your computer. You can also download lovely free fonts online. Just google for free font.
Read the fine print and make sure you use them within the terms and conditions given. Most would allow you to use for personal use.
Otherwise, you can also purchase them cheaply which I normally do as I'm addicted not just to rubber stamps but also to beautiful fonts especially calligraphy fonts ;-)
Making the Color of Spring Card
Card Making Supplies:
1. rubber stamps : any flowers and butterflies design (I used Butterflies stamp from Posh Impressions and flowers from a flower frame by Stamp-It to make this colour of spring card)
2. off white cardstock
3. Brilliance inkpads : Pearlescent Orchid and Pearlescent Sky Blue
4. color markers: yellow, pink and green.
5. glitter glue
6. scissors
7. decorative trimmer
8. ordinary double-sided tape
9. double-sided foam tape
Card Making Instructions:
2. Print on off white cardstock.
3. Ink flower rubber stamp with Brilliance Pearlescent Orchid inkpad and stamp on off white cardstock. Stamp around 15 to 16 flower images. If possible of different sizes.
4. Ink butterflies stamp with Brilliance Pearlescent Sky Blue and stamp on off white cardstock.
5. Color images with markers and glitter glue.
6. Cut out stamped images.
7. Arrange and paste on the printed color of spring card around the message. (Refer to picture above for positioning.)
8. You can use double-sided tape for some flowers and foam tape for the butterflies and the rest of the flowers.
9. Using decorative trimmer or scissors, cut a strip of off white card. Staight cut on one side and decorative on the other side of the long strip.
10. Ink the whole strip with the Brilliance Pearlescent Orchid ink. You can just pull the strip across the inkpad.
11. Apply glue and paste onto the right edge of the card.
12. Cut around the flowers on the top of the card.
Making Greeting Cards! › Card Making Ideas › Colour of Spring Card
Making Greeting Cards! › Color for the Card Designer › Colour of Spring Card
Like This Site?
|
| |
Celebrating Creativity! Connecting Lives!
~ bringing cheer one card at a time.
Help Me Get The Word Out

If you like making greeting cards and want to encourage others to do so because of its many benefits, please help me share this website with your friends. Just click on the share buttons below to share with your fans and friends. Thank you for sharing the good things in life :-)
Top of Colour of Spring Card


New! Comments
Have your say about what you just read! Leave me a comment in the box below.