- Home
- Birthday Cards
- Hero Arts Rubber Stamps
A Selection Of Cards Made with Hero Arts Rubber Stamps
Hero Arts Rubber Stamps are very versatile and with a little know-how, your homemade cards can look so attractive.
I love to use Hero Arts stamps. They have many lovely designs that are simply irresistible. I especially love their Poetic Prints Stamps.
Below are two homemade cards made with several of Hero Arts rubber stamps. I have combined the stamped images with colour markers, paper punch, buttons and glitter glue.
Card Making Tips: These are card making projects you can make in an afternoon. Make a few and use them as "Thank You Cards" or just cards to keep in contact with your loved ones or friends.
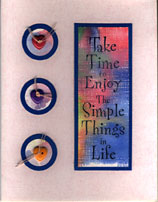 Take Time
Card Making Supplies:
- Baby pink colour blank basic card
- Small piece of blue colour card
- Small piece of baby pink colour card
- 3 heart shaped buttons (red, purple & yellow)
- Baby pink colour thread
- Words stamp: Take Time To Enjoy The Simple Things In Life by Hero Arts Stamps
- Background Stamp: by All Night Media Rubber Stamps
- Shadow stamp: Eclipse Square by Hero Arts Stamps
- Colour markers: Pink, Blue, Yellow & Green
- Paper punches: Circle (small & medium)
- Water brush
- Glue
- Paper trimmer
- Water spray
- Heat gun
- Black detail embossing powder
- Memories black ink pad
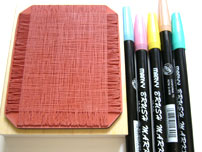 Background Stamp
Card Making Instructions:
- Apply colours all over the background stamp with colour markers.
- Spray water on the stamp to move the colours.
- Stamp image on the small piece of baby pink card.
- Dry with the heat gun.
- Gently tap Words stamp on black inkpad and stamp on the background image. (refer image below)
- Pour black detail embossing powder on the stamped image and tap off excess powder.
- Melt powder with heat gun.
- Trim card and layer on blue colour card.
- Brush some colours on the shadow stamp with colour markers and spray with water.
- Stamp on leftover baby pink card and when dry, punch 3 small circles.
- Use paper punch to punch out 3 medium circles with the blue colour card.
- Pierce holes and attach buttons to the circles with thread.
- Apply glue and attach to the baby pink blank basic card.
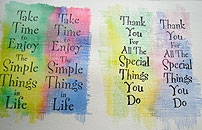 Word Stamped Images
Below is another card created using the same rubber stamp image. Sorry that the images are not big and clear but hope they give you an idea and I'm sure you'll be able to come up with more creative ideas for using these rubber stamped images.
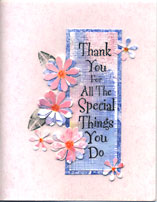
For this card, I added the steps below:
- From leftovers from the baby pink card, punch 6 medium flowers and 4 small flowers.
- Apply glue and attach layered card on the baby pink colour blank basic card.
- Ink the leaf stamp with green colour ink and stamp on the blank basic card.
- Apply glue to the punched flowers and attach to the card.
- Use the orange colour gel pen to draw a gathering of dots in the centre of each flower.
Making Greeting Cards! › Rubber Stamped Cards › Hero Arts Rubber Stamped Card
Like This Site?
|
| |
Celebrating Creativity! Connecting Lives!
~ bringing cheer one card at a time.
Help Me Get The Word Out

If you like making greeting cards and want to encourage others to do so because of its many benefits, please help me share this website with your friends. Just click on the share buttons below to share with your fans and friends. Thank you for sharing the good things in life :-)

New! Comments
Have your say about what you just read! Leave me a comment in the box below.